0%

I work with a data warehouse in Redshift. I recently needed to export a large set of data out. I started testing querires with smaller result sets using DataGrip’s “Export to file…” option. When I moved to running the full queries with larger result sets, my connection to Redshift was timing out before the result set came in.

Redshift has a documented way to export large data sets in the UNLOAD statement. UNLOAD will only export data to S3 buckets though, and I didn’t have an S3 bucket easily available.

Searching for solutions brought up some results describing exporting data using postgres’s psql tool directly. In the end, I was able to export the data this way, but it took some experimentation to get it in the format I was looking for.

The steps I ended up taking were:

  1. Change psql to output in “unaligned” format:
    1
    \a
    This changes output from the ASCII-art default format to a comma-separated value format. Or really, separated by whatever character you like. I needed tabs.
  2. Change psql to use tab as the delimiter:
    1
    \f '\t'
    That’s the exact string you need to use. I first tried to pass a literal tab character using the Control-V, Tab pattern, but psql interprets the tab literal as whitespace. Quoting the tab changes the delimiter in to the full string of a tab surrounded by two quotes – not what I was hoping for.
  3. Change the output to target a file:
    1
    \o output_filename.tsv
    After this psql outputs query results to a file with the given name in the current directory. It clears the file before outputting. A simple \o without a filename later will change output back to standard output.
  4. Run the query as normal:
    1
    select * ...
    The first line of the output file is a header row, followed by all the data rows with the specified delimiter, and finally a line reporting how many rows were selected.

In my case, I then tar and bzip2’d the results and was able to scp them back to my laptop without trouble.

I’ve been doing some work in our Redshift data warehouse lately. Creating Temp Tables has simplified my queries dramatically. I’ve been using the DataGrip IDE to connect to Redshift. It has a minor bug affecting create table as that I tripped over repeatedly while working out my queries.

If the query includes a distkey or sortkey, DataGrip won’t recognize that the query continues after the as if there is nothing further on the line.

But, I was able to quickly work around this by just putting as and select on the same line.

1
2
3
CREATE TABLE table_name DISTKEY (id) SORTKEY (id) AS SELECT
DISTINCT(t.id) AS id
FROM ...

C#’s using statement is well recognized for one thing: calling dispose on objects so that you don’t have to. That bit is wonderful:

string contents;
using (var f = File.OpenText("/path/to/file") {
    contents = f.ReadToEnd();
}

This is much simpler than the fully spelled out alternative:

string contents;
var f = File.OpenText("/path/to/file");
try {
    contents = f.ReadToEnd();
} finally {
    f.Dispose();
}

And even this longer form actually misses one of the more interesting aspects of the using statement…

string contents;
var f = File.OpenText("/path/to/file");
try {
    contents = f.ReadToEnd();
} finally {
    f.Dispose();
}
f.ReadToEnd(); // oops! ObjectDisposedException at runtime
f = null; // you could set it to null
f.ReadToEnd(); // but now you have a NullReferenceException, even more mysterious

The using statement on the other hand, creates a scope, so its variable can’t be referenced at all after it is disposed:

string contents;
using (var f = File.OpenText("/path/ro/file") {
    contents = f.ReadToEnd();
}
f.ReadToEnd(); // unknown identifier error at compile-time

An entirely equivalent bit of code can be written, using an anonymous scope, but it starts to look quite baroque:

string contents;
{
    var f = File.OpenText("/path/ro/file");
    try {
        contents = f.ReadToEnd();
    } finally {
        f.Dispose();
    }
}
f.ReadToEnd(); // Unknown identifier at compile-time again, but 2x the lines and 2x the scopes!

using provides the try-finally-dispose structure, and also provides a scope. The scope means a whole class of errors where resources are accessed after being released is transformed from run-time to compile-time errors. Dealing with errors at compile-time is quicker, and with the right tools to highlight problems, the compile problems can be seen directly in the code as it is being edited.

Mobile phones have a couple of options when rendering existing web pages: they can render a page at the native resolution of the screen, or they can render it on a larger virtual screen and then “zoom out” so that the whole page fits on the screen. The virtual screen is called the “viewport.”

Ideally screen resolution shouldn’t matter for the web, but many existing pages on the web won’t render well at a smartphone’s native resolution. After all, even in 1993 when the web started, most screens were at least 640 pixels wide. The iPhone by contrast is 320 pixels by 480 pixels[1]. Over the years, web designers have assumed that there will be at least that much width to lay out their pages across, and don’t consider how layouts break when the screen is narrower. In order to render all these existing web pages well, mobile browsers choose the path of rendering to a larger viewport and scaling the content to fit the page on screen. Safari on iOS uses 980 pixels as the default viewport width.

When targeting a web page at small screen devices, it could be nice to have the screen resolution match the viewport size. The viewport meta tag was introduced to allow a designer to request exactly that, that the phone should render the page at its native resolution.

As explained in the Safari html reference, there are six things that can be specified on the meta tag:

We found out early on in the Democracy Now! mobile site project that some of the attributes in combination have some surprising effects when combined with rotating the device. Ultimately, initial-scale turned out to be the culprit.

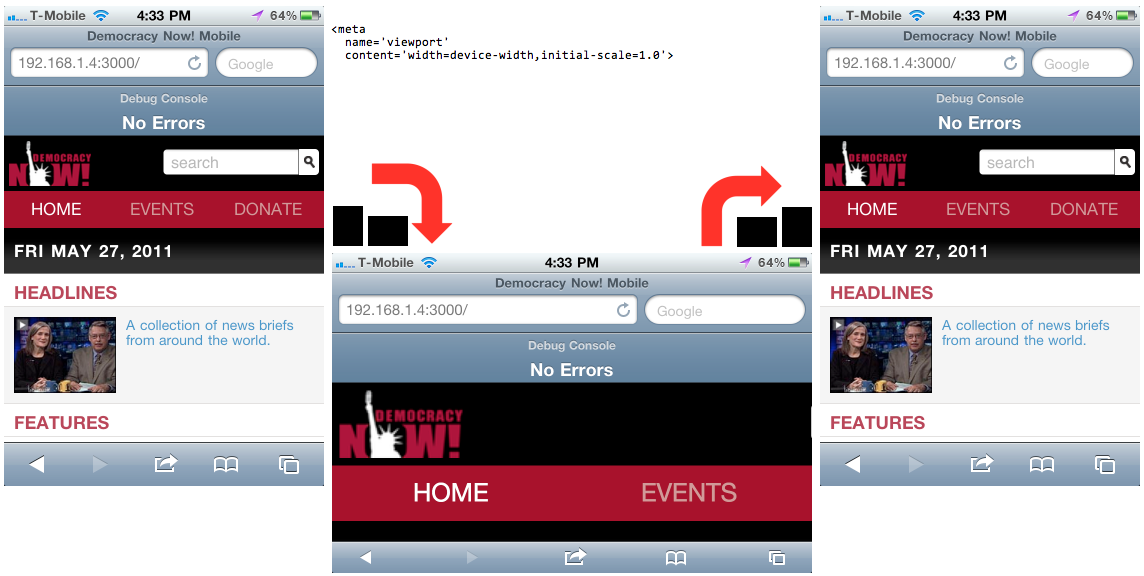
My initial guess based on the documentation was to set both width and initial-scale, but this causes the site to be “too wide” when the phone is rotated from portrait to landscape:

1
<meta name='viewport' content='width=device-width,initial-scale=1.0'>

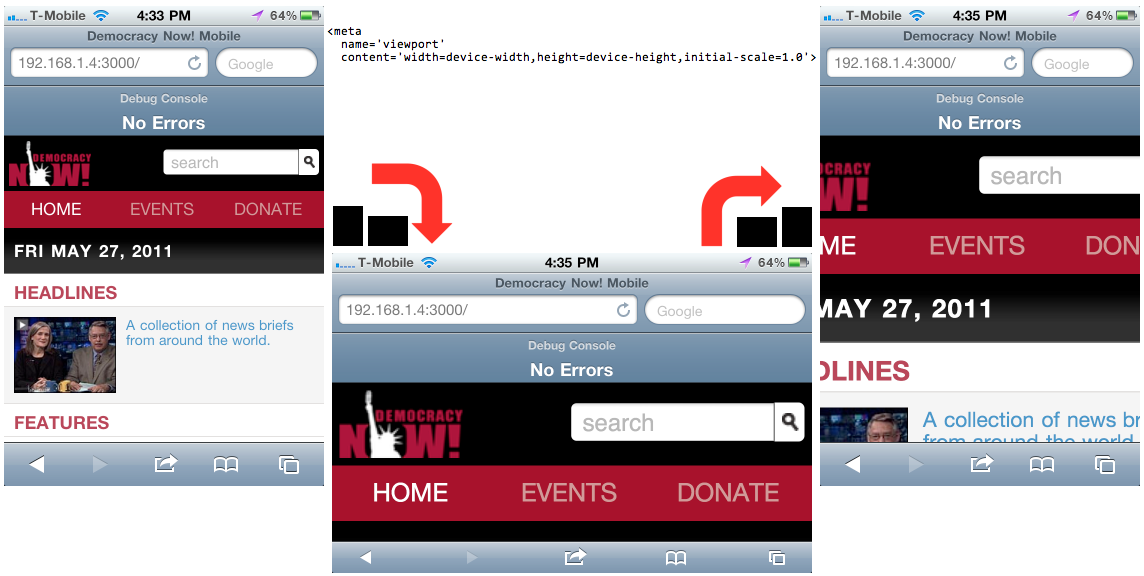
Second thought was to set height as well as width, and initial-scale. This makes the portrait to landscape rotation work as expected, but causes a similar “too wide problem” when rotating from landscape to portrait:

1
<meta name='viewport' content='width=device-width,height=device-height,initial-scale=1.0'>

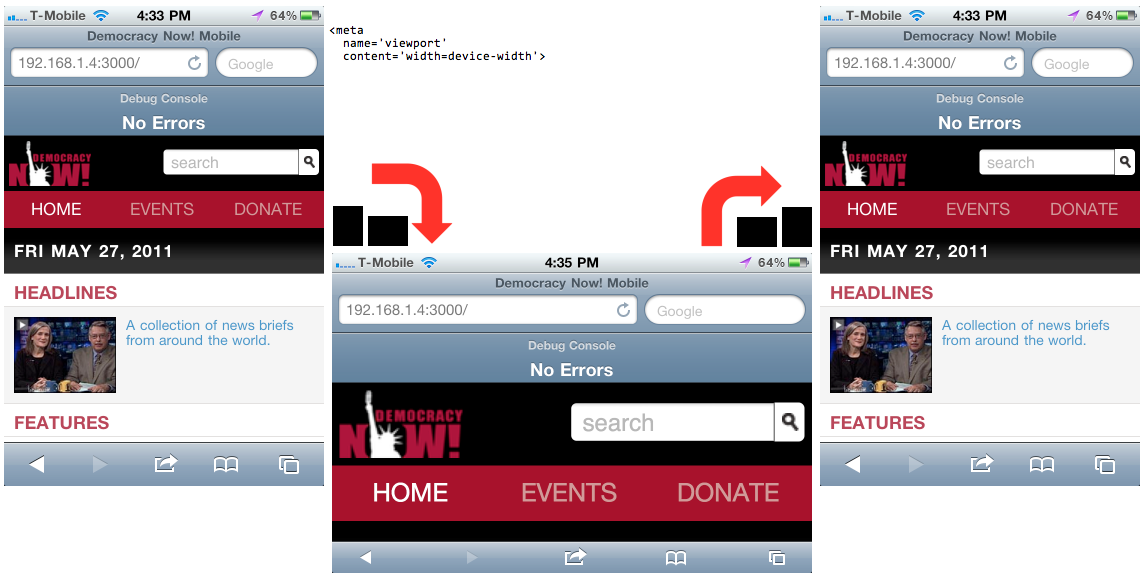
The solution turned out to be not setting initial-scale at all. Device-width is enough to set the viewport width to the real width of the device, and a scale is not needed – 1.0 is assumed it would seem.

1
<meta name='viewport' content='width=device-width'>

When I come across a bug like this, I like trying to come up with a mental model of what is going wrong in the code to create the undesired behaviour. This is useful when debugging my own code and useful when trying to work around apparent bugs in other people’s code.

I haven’t built a good mental model of what is going wrong here. My best guess is that the width and the scale are being decided at different points during a rotation, and are getting out of sync. In the first example it could be that the width and scale are decided before rotation: 320 and 1.0. Then during rotation scaling and width are both changed, but independently. For scale, it is decided that 320 viewport pixels are now being rendered across 480 physical pixels, so scale factor can be 3/2 (three physical pixels for every 2 virtual pixels). Independently, it is decided that the page can now be rendered across 480 pixels. We end up with a viewport that is 480 virtual pixels wide, scaled by 3/2 so that only 320 of those pixels are in the visible area.

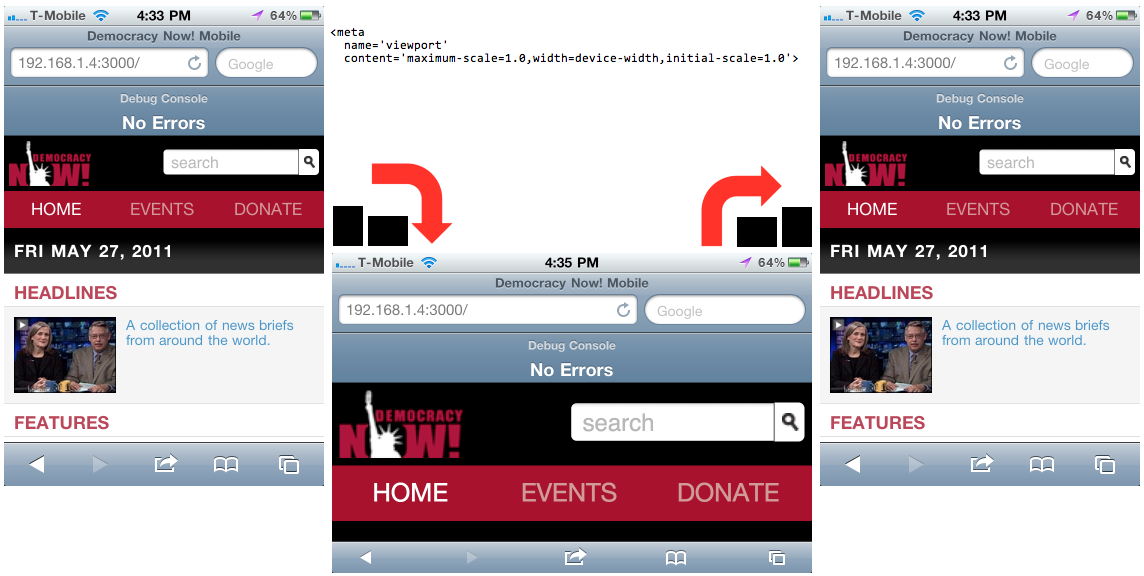
This model suggests another possible fix. If the model is correct, constraining the scale-factor to 1.0 would fix the problem. Only the number of available pixels will change, rather than both scale and width at the same time. The downside of this solution is that the user would no longer be able to zoom in. Trying it out, it works:

1
<meta name='viewport' content='maximum-scale=1.0,width=device-width,initial-scale=1.0'>

The movement after a rotation as the page recombobulates itself seems revealing. It is different for each of the above combinations. I can’t show transitions here; you’ll have to try them out yourself to see.

In the end, we went with the solution of only specifying ‘width=device-width’. This worked well on the iPhone and on other browsers. Other browsers have different freaky scale things that happen after a rotation, including one bug that is still affecting us on Android 2.1.

Thanks to Dani Schufeldt for testing and raising this defect until it was fixed properly, and Ted Nielsen for working the layouts around it.

[1] I’m ignoring the double-density iPhone 4 screen, because I can’t remember the separate terminology to keep it all straight. I might come back later and edit the blog post.

I have a couple of one terabyte external hard drives. When I first got them I formatted them with FAT32 so that I could read and write them from both Windows and OS X.

FAT32 is not a journaling filesystem, which means if a write operation is interrupted the drive can end up in an inconsistent state. Within the first month of using the drive, I corrupted the filesystem. I forget exactly what happened: did I knock the power cord out? forget to eject the drive?

Luckily when this happens to a FAT32 disk the files can be recovered. Unfortunately, the filenames are lost. You get a folder called FOUND.000 with files named FILE0000.CHK up to, in my case, FILE0820.CHK. The extension on filenames is important on Windows and on OS X as well because Finder relies on it.

Unix-like systems come with a utility, called file, that can determine file types by examining the contents. When I first read about file it was described as checking the first 2-bytes, called the magic number or magic cookie. More modern versions must check more of the file, because they offer more information than can be contained in 2-bytes.

➜ {ninja} FOUND.000 $ file *.CHK
FILE0004.CHK: RIFF (little-endian) data, AVI, 628 x 254, 25.00 fps, video: DivX 5, audio: MPEG-1 Layer 3 (stereo, 48000 Hz)
FILE0007.CHK: RIFF (little-endian) data, AVI, 580 x 306, 23.98 fps, video: DivX 5, audio: MPEG-1 Layer 3 (stereo, 48000 Hz)
FILE0009.CHK: RIFF (little-endian) data, AVI, 576 x 320, 23.98 fps, video: XviD, audio: MPEG-1 Layer 3 (stereo, 48000 Hz)
FILE0013.CHK: RIFF (little-endian) data, AVI, 612 x 250, 23.98 fps, video: DivX 5, audio: MPEG-1 Layer 3 (stereo, 48000 Hz)
FILE0016.CHK: RIFF (little-endian) data, AVI, 592 x 320, 25.00 fps, video: XviD, audio: MPEG-1 Layer 3 (stereo, 48000 Hz)
FILE0019.CHK: RIFF (little-endian) data, AVI, 608 x 288, 25.00 fps, video: XviD, audio: MPEG-1 Layer 3 (stereo, 48000 Hz)
FILE0022.CHK: RIFF (little-endian) data, AVI, 640 x 272, 23.98 fps, video: XviD, audio: MPEG-1 Layer 3 (stereo, 44100 Hz)
FILE0026.CHK: PNG image, 640 x 272, 8-bit/color RGB, non-interlaced
FILE0027.CHK: PC bitmap, Windows 3.x format, 640 x 272 x 32
FILE0028.CHK: PNG image, 640 x 272, 8-bit/color RGB, non-interlaced

I wanted to at least check what the contents of my FOUND files were before deleting them. I needed to get the appropriate extensions back on the filenames so that finder and other tools would work with them properly. I thought I should be able to do it completely in the shell, and best of all, it’s already a REPL!

First step was to sort them by type.

➜ {ninja} FOUND.000 $ file *.CHK | grep PNG
FILE0026.CHK: PNG image, 640 x 272, 8-bit/color RGB, non-interlaced
FILE0028.CHK: PNG image, 640 x 272, 8-bit/color RGB, non-interlaced

Next I needed the filename by cutting the first 8 characters. I did not know about cut before but I’ve certainly needed to pull a section out of a line before. I expect I’ll be using it again.

➜ {ninja} FOUND.000 $ file *.CHK | grep PNG | cut -c 1-8
FILE0026
FILE0028

I needed to turn these lines in to separate mv commands and xargs does exactly that. I had not used xargs beyond entirely simple commands before but the man page was enough to get me started. Since I was about to move files without a safety net, I wanted to do a quick test first.

➜ {ninja} FOUND.000 $ file *.CHK | grep PNG | cut -c 1-8 | xargs -I filename echo filename.CHK filename.png
FILE0026.CHK FILE0026.png
FILE0028.CHK FILE0028.png

Looked good, so it was time for the real command.

➜ {ninja} FOUND.000 $ file *.CHK | grep PNG | cut -c 1-8 | xargs -I filename mv -v filename.CHK filename.png
FILE0026.CHK -> FILE0026.png
FILE0028.CHK -> FILE0028.png

With the extensions corrected Finder is once again previewing and opening the files correctly. It’s working well for videos and images. I think multi-volume rars are going to be more of a challenge.

This was all prompted by Usher being released today. I’ve wanted an application to manage videos on OS X for a while.
Objective-C has the power of Ruby, with duck-typing and dynamic dispatch in the object layer. At the same time it has the power of C, with direct access to memory layouts and static-weak typing below the object layer. Sometimes, the two powers can be combined for some unexpected results.

On my current project we are trying to unit test as much functionality as we reasonably can. I am quite happy to write interactionist tests, so I need test doubles. Although the Objective-C compiler does static type checking at compile time, at run-time Objective-C objects will respond to any message for which they have a method defined.

This makes creating test doubles very easy. Consider a controller that accepts an error delegated from a CLLocationManager, and delegates it on to a logging class. Fragments of the classes involved might look like this:

@interface Logger : NSObject

- (void)log:(NSError *)error;

@end

@interface LocationSensitiveController  : NSObject

- (id)initWithLogger:(Logger *)logger;
- (void)locationManager:(CLLocationManager *)manager didFailWithError:(NSError *)error;

@end

In my test I would like to use a test double in place of the logger, and assert that the same error gets passed along:

- (void)testShouldPassErrorToLogger;
{
  Logger *stubLogger = // how to create the stub logger?
  LocationSensitiveController *controller = [[[LocationSensitiveController alloc] initWithLogger:stubLogger] autorelease];

The stub logger need only understand the log: message to serve its purpose. It does not need to have any relationship to the Logger class. I’ve been calling these classes “Pretend…” because the class is only pretending to be the other type. They would be stubs in the Test Double taxonomy that Martin Fowler popularised.

@interface PretendLogger : NSObject

- (void)log:(NSError *)error;
- (NSError *)receivedError;

@end

The compiler will reject a straight assignment:

  Logger *stubLogger = [[[PretendLogger alloc] init] autorelease]; // type error

The low-level C power can be used to convince the compiler otherwise:

  Logger *stubLogger = (Logger *)[[[PretendLogger alloc] init] autorelease];

In C this type of cast is sometimes called a brutal cast. The cast tells the compiler to interpret the same area of memory as a different type. All Objective-C classes share the same basic memory layout, so in the example the cast “sneaks” the PretendLogger past the compile-time static checking and in to the LocationSensitiveController instance. There it will receive messages intended for Logger, and because it implements a method for the same selector (log:), the code will run successfully.

Using a cast, I can write the test using my PretendLogger class:

@implementation LocationSensitiveControllerTest

- (void)testShouldPassErrorToLogger;
{
  Logger *stubLogger = [[[PretendLogger alloc] init] autorelease];
  LocationSensitiveController *controller = [[[LocationSensitiveController alloc] initWithLogger:stubLogger] autorelease];
  NSError *expectedError = [NSError errorWithDomain:@"domain string" code:666 userInfo:nil];

  [controller locationManager:nil didFailWithError:expectedError];

  NSError *actualError = [(PretendLogger *)stubLogger receivedError];
  GHAssertEquals(expectedError, actualError, @"error should be received by logger");
}

@end

Eventually a mocking framework makes sense, or real classes can be used with method swizzling. When getting started on a project or a new area of code, this is a very simple approach to get some interaction tests going.

I’ve posted a complete xcode project incorporating the example test to github.

I’ve been working on an entry for Victoria’s AppMyState competition. Although I started by doing some javascript and some Ruby on Rails, the RoR part quickly became superfluous and I ended up writing a purely javascript app. It’s a mash-up of Google Maps, Google’s geocoding and hopefully some Street View too, so javascript is a good fit. There’s also a python script to massage the government data in to a useable form, but that’s behind the scenes.

The data I’m displaying is divided in to 11 categories and I want to treat each category separately, so I was ending up with repetitive code.

var horseTroughMgr = new MarkerManager(map);
var horseTroughMarkers = [];
var i = Horse_Trough.length;
while (i--) {
  var trough = Horse_Trough[i];
  var point = new GLatLng(trough.latitude, trough.longitude);
  var marker = createMarker(point,'

#### ' + trough.category + '
');
  horseTroughMarkers.push(marker);
  horseTroughMgr.addMarker(marker, 0);
}
horseTroughMgr.refresh();

var litterBinMgr = new MarkerManager(map);
var i = Litter_Bin.length;
while (i--) {
  var bin = Litter_Bin[i];
  var point = new GLatLng(bin.latitude, bin.longitude);
  var marker = createMarker(point,'

#### ' + bin.category + '
');
  litterBinMgr.addMarker(marker, 19);
}
litterBinMgr.refresh();

var hoopMgr = new MarkerManager(map);
var i = Hoop.length;
while (i--) {
  var hoop = Hoop[i];
  var point = new GLatLng(hoop.latitude, hoop.longitude);
  var marker = createMarker(point,'

#### ' + hoop.category + '
');
  hoopMgr.addMarker(marker, 15);
}
hoopMgr.refresh();

… and 8 more similar blocks.

The first block has an extra list of markers, and I wanted to add that to the other blocks. I also had an intuition that I didn’t need both the list and the manager. I was holding back because I wasn’t sure, and with the duplication I didn’t feel that confident about refactoring. Then I remembered I could have two return values, and things started getting easy:

function setupCategory(map, data, minZoom) {
  var mgr = new MarkerManager(map);
  var list = [];

  var i = data.length;
  while (i--) {
    var item = data[i];
    var point = new GLatLng(item.latitude, item.longitude);
    var marker = createMarker(point,'

#### ' + item.category + '
');
    list.push(marker);
    mgr.addMarker(marker, minZoom);
  }
  mgr.refresh();
  return { manager: mgr, list: list };
}

function initialize() {
  var map = new GMap2(document.getElementById("map"));
  map.setCenter(new GLatLng(-37.8062649904, 144.96165842), 10);
  map.setUIToDefault();

  var trough = setupCategory(map, Horse_Trough, 0);
  var bin = setupCategory(map, Litter_Bin, 19);
  var hoop = setupCategory(map, Hoop, 15);

Having it in this form made it very easy to figure out that I didn’t need the manager returned from setupCategory(), and I could only return the list. And because it was only in one place, it was easy to change.

This progression works well for me when I’m refactoring: eliminate the duplication, which makes it easier to see a way to simplify the code. Sometimes simplifying the code exposes more duplication and it turns in to a cycle, but not always. I’m often tempted to try to do this in two steps, but that usually ends up in trouble where I’m making mistakes, breaking things, and then hacking them back together.

Javascript’s object literals made it easy to return two values which is what I needed here. In C# I would have needed a new class or some anonymous class and reflection. (Or maybe the dynamic keyword in C#4?) It is higher friction in static languages. This must be the reduced friction dynamic language enthusiasts brag about!

I should note that this seems not to be the best way to handle markers in many categories. It’s better to have a manager per-category.

I maintain a Windows server. It is web-facing, and lives in a DMZ on the other side of the world from me. I have to install new programs every now and then. Windows being Windows, it’s easiest to do this with a desktop session. Remote Desktop Connection is the key tool for doing this. Since the version of Remote Desktop Protocol (RDP) I’m connecting to isn’t secure over the public Internet I use an ssh tunnel to connect. This is easy to set-up in Putty.

01_initial_settings.png

An ssh tunnel works by accepting packets on one side of the ssh connection, and putting them back in to the TCP/IP stack on the other side of the tunnel – as if the packets originated from the “far” computer. This can be done in either direction. In the screenshot above I’ve configured a tunnel accepting packets on my local machine. They will be re-injected on the remote machines stack addressed to “localhost:3389”. In other words a program connecting to my computer’s port 3390 will actually connect to the remote computer’s port 3389. Port 3389 is Remote Desktop Protocol, so if I point RDC at localhost:3390, I’ll connect to the remote computer’s RDP server.

02_RDC_connection_localhost.png

I recently started using Windows 7 and this set up broke. It seems in Windows 7, Remote Desktop Connection prevents connections to localhost. Trying to work around the limit using 127.0.0.1 or your public IP address or computer name does not work either. RDC still recognises that you are, apparently, connecting to the computer you are already connected to. This is an awkward limitation when using an ssh tunnel or some other connection forwarding.

Luckily there is a workaround.

Apparently Windows XP before service pack 2 had this same limitation. People worked around it by pointing RDC at 127.0.0.2. It’s not used that often, but the whole range of addresses starting with 127 are all routed back to the local machine. In other words you always have a /8 network running on your own machine. To make this work, I had to check the “Local ports accept connections from other hosts” option for putty. Without the option putty will only listen for connections to address 127.0.0.1. With the option it accepts connections on any address. Now I can point RDC at 127.0.0.2:3390 and get connected to the remote desktop, securely.

03_revised_settings.png

It seems a strange limitation for RDC to refuse to connect to localhost. I can understand the initial idea; having this limit would prevent remoting to a computer you are already remoted to. That’s an easy enough mistake to make if you are managing several servers, and it’s a nice save. The strange bit is that someone repealed the limit in XP SP2, but now it is back again. How does that happen? Was SP2 on a branch, and they forgot to merge it back? Was the limit in the original spec, and the spec didn’t get updated when the limitation was removed? Did they just decide the limit feature was back in? As someone stung by the reintroduction of the feature, it feels like an accidental regression.

04_RDC_connection_127_0_0_2.png

While I was preparing my last blog post about mixins in C#, I was also reading about go. From looking at go’s syntax, I thought I would be able to replace the C# code one-for-one with go code and end up with a valid program. I thought this would be the code:

// Not actually valid go!

package main

import "fmt"

type IAddress interface {
    StreetNumber string;
    StreetName string;
}
func (a IAddress) ToOneLineFormat() string {
    return a.StreetNumber() + " " + a.StreetName()
}

type Address1 struct {
    StreetNumber, StreetName string
}
type Address2 struct {
    StreetNumber, StreetName string
}

func main() {
    address1 := &Address1{"12A", "Spencer Street"};
    fmt.Println(address1.ToOneLineFormat());

    address2 := &Address2{"12A", "Spencer Street"};
    fmt.Println(address2.ToOneLineFormat())
}

I liked this code. It’s slightly more lightweight than the equivalent C# because the interfaces don’t need to be explicitly declared on the implementing classes. Otherwise it’s quite similar. Declaring funcs away from types seemed a natural analogue to the interface + extension methods approach I described in the last post.

But this is not valid go code. Why not?

The first point is, that I’ve confused C#’s concept of properties with both fields and methods in my go code. The declarations in the structs can remain as fields, but the declarations in the interface must change to be methods. My interface needs to be:

type IAddress interface {
    StreetNumber() string;
    StreetName() string;
}

Now, to conform to the interface the two Address types need to have methods that correspond to the interface. Not fields.

type Address1 struct {
    streetNumber, streetName string
}
func (a Address1) StreetNumber() { return a.streetNumber }
func (a Address1) StreetName() { return a.streetName }
type Address2 struct {
    streetNumber, streetName string
}
func (a Address2) StreetNumber() { return a.streetNumber }
func (a Address2) StreetName() { return a.streetName }

Address1 and Address2 now both conform to the IAddress interface, though at the price of duplicate property/accessor/getter code. Accessors like this aren’t particularly idiomatic for go, so there is no syntactic sugar to support them. Members are intended to either be fields, possibly public, or methods implementing significant behaviour.

The next problem arises because in go methods cannot be defined on interfaces. The syntax would seem to allow it, but it is simply illegal. The receive of a method must be a pointer to a named type or a named type itself. No interfaces. And also none of the familiar basic types like int, float and so on because they are unnamed types. A particular named type that aliases a basic type can have methods defined on it however. Coming back to this experiment, ToOneLineFormat needs to have a concrete receiver:

func (a Address1) ToOneLineFormat() string {
    return a.StreetNumber() + " " + a.StreetName()
}
func (a Address2) ToOneLineFormat() string {
    return a.StreetNumber() + " " + a.StreetName()
}

At this point I have brought back all the duplication that I was hoping to eliminate. On the up side, I have working go code.

Go has its own mechanism to reduce duplication. Its based on composing new types from existing types. A type can have an unnamed field of another type. The properties of the second, contained type can be accessed as if they were properties of the containing type. Address1 and Address2 could be defined in terms of a BaseAddress type.

type BaseAddress struct {
    streetNumber, streetName string
}
type Address1 struct {
    BaseAddress
}
type Address2 struct {
    BaseAddress
}

These new versions of Address1 and 2 will have exactly the same fields as the old type. An object composed like this can also receive methods as if it were an object of the anonymous field’s type. This allows us to move the ToOneLineFormat method on to BaseAddress directly. Also, since StreetNumber() and StreetName() simply return the value of fields which are available on BaseAddress, we can remove them. This in turn means IAddress is no longer useful. The complete code for Address1 and Address2 is significantly more compact. Note that the initialisation expression does need to change now, to recognise the anonymous BaseAddress field.

type BaseAddress struct {
    streetNumber, streetName string
}
func (BaseAddress a) ToOneLineFormat() {
    return a.streetNumber + " " + a.streetName
}
type Address1 struct {
    BaseAddress
}
type Address2 struct {
    BaseAddress
}

func main() {
    address1 := &Address1{BaseAddress{"12A", "Spencer Street", "Melbourne", "VIC", "3000"}};
    fmt.Println(address1.ToOneLineFormat());

    address2 := &Address2{BaseAddress{"12A", "Spencer Street", "Melbourne", "VIC", "3000"}};
    fmt.Println(address2.ToOneLineFormat())
}

Address1 and Address2 themselves are looking redundant now. Having a BaseAddress with two classes that “inherit” from it seems to clash strongly with the ideas of go. Based on this exercise, I believe an anonymous field still needs to capture some freestanding meaning of its own. The two types are a somewhat artificial constraint anyway. I’ll leave them here, as they were the two classes that motivated this experiment originally.

Hopefully in go, you won’t often end up in the same situation we faced in C#, needing two structurally identical types.

On my current project, we have ended up with several classes that have the same, or nearly the same fields. The classes are generated from xsds that describe a set of SOAP services that we integrate with. We have tried avoiding the generation or tweaking the xsds to avoid the situation, but accepting the duplicate classes actually seemed to be the best way forward. So, we have code in a generated file like this:

namespace ServiceClients.Generated
{
    public partial class Address1
    {
        public string StreetNumber { get; set; }
        public string StreetName { get; set; }
        public string Suburb { get; set; }
        public string State { get; set; }
        public string PostCode { get; set; }
    }

    public partial class Address2
    {
        public string StreetNumber { get; set; }
        public string StreetName { get; set; }
        public string Suburb { get; set; }
        public string State { get; set; }
        public string PostCode { get; set; }
    }
}

Besides the obvious problem with duplication, this code is also difficult to extend. As just one example, we wanted to display addresses in a one-line format:

var address = new Address1
                  {
                      StreetNumber = "12A",
                      StreetName = "Spencer Street",
                      Suburb = "Melbourne",
                      State = "VIC",
                      PostCode = "3000",
                  };
Assert.AreEqual("12A Spencer Street, Melbourne, VIC 3000",
                address.ToOneLineFormat());

The implementation for this method is fairly simple, but where can we implement it so that we will only need to write it once? Ideally what we would like is a mixin: a way of adding new methods to a class without adding any fields, and without necessarily changing the type. Although C# does not have a language facility for mixins, we can get a similar effect by using an interface and an extension method.

namespace ServiceClients.Generated.Extensions
{
    public interface IAddress
    {
        string StreetNumber { get; }
        string StreetName { get; }
        string Suburb { get; }
        string State { get; }
        string PostCode { get; }
    }

    public static class AddressExtensions
    {
        public static string ToOneLineFormat(this IAddress address)
        {
            const string format = "{0} {1}, {2}, {3} {4}";
            return string.Format(format,
                    address.StreetNumber,
                    address.StreetName,
                    address.Suburb,
                    address.State,
                    address.PostCode);
        }
    }
}

There is one more step. In C# the two concrete types need to explicitly implement the IAddress interface so that we can use the ToOneLineFormat method on them. I’ve never had much use for partial classes, but they were a lifesaver in this case. In another file away from the mammoth 40,000 line long svcutil generated file, the interface can be easily added to both classes.

namespace ServiceClients.Generated
{
    public partial class Address1 : IAddress {}
    public partial class Address2 : IAddress {}
}

And there it is: a mixin! The ToOneLineFormat method is defined in one place, can be used with either Address class, and there is no need to change the generated code or the inheritance hierarchy.

For a time I was quite sure I had heard that methods implemented directly on interfaces would be part of C# 4. I must have been delusional though, because it is not on the list of new features. If it were, it seems it would just be syntax sugar for the above approach.