0%

I was recently debugging a situation involving CruiseControl.net where one <exec> task would not complete until a second <exec> task in an unrelated project completed.

When it was originally described on the mailing list, I thought it might be some interaction between batch files and the parallel task in the ProcessExecutor class. ProcessExecutor encapsulates the concurrency aspect of running an external process and if there is a concurrency problem with processes, it’s probably in that class.

In any case, at that point I was seriously misunderstanding the problem, but it led me to some interesting debugging. For the debugging, I wanted to create a few long running batch files to run in parallel. But what is the batch equivalent of Thread.Sleep?

The pause command came to mind. It has no capabilities beyond displaying a “press any key” prompt and waiting for input. No parameters or switches at all. There is no sleep command, as there is in bash. wait came to mind, but it is not a command either. I went to google…

And met with success. The choice command can be used as a timed delay. The forum I found it in made it sound as if choice is not available on every platform, but my Windows Server 2003 development image has it. The exact syntax of the command does seem to vary between versions, as some example on the web do not work on my system. For me, a command to wait five seconds is

choice /M:"Waiting for 5 seconds" /T:5 /D:Y /C:Y

A simple one-line batch file that waits for a given number of seconds is

@choice /M:"Waiting for %1 seconds" /T:%1 /D:Y /C:Y

As with many command-prompt commands, you can see more information about the command including the exact syntax for your version with

choice /?

If you are writing a cmd or bat script and need to wait or sleep for a short time, choice is well, choice.

Recently, while debugging some strange problems with our build, I flipped on MSBuild’s diagnostic output level. I was surprised and delighted to see a profile of my build at the end of the output. Here’s what the output looks like for CruiseControl.Net’s clean target:

Project Performance Summary:
       16 ms  C:\code\ccnet-trunk\project\CCTray\CCTray.csproj   1 calls
                 16 ms  Clean                                      1 calls
       16 ms  C:\code\ccnet-trunk\project\CCTrayLib\CCTrayLib.csproj   1 calls
                 16 ms  Clean                                      1 calls
       16 ms  C:\code\ccnet-trunk\project\service\service.csproj   1 calls
                 16 ms  Clean                                      1 calls
       16 ms  C:\code\ccnet-trunk\project\console\console.csproj   1 calls
                 16 ms  Clean                                      1 calls
       16 ms  C:\code\ccnet-trunk\project\objection\objection.csproj   1 calls
                 16 ms  Clean                                      1 calls
       16 ms  C:\code\ccnet-trunk\project\WebDashboard\WebDashboard.csproj   1 calls
                 16 ms  Clean                                      1 calls
       16 ms  C:\code\ccnet-trunk\project\UnitTests\UnitTests.csproj   1 calls
                 16 ms  Clean                                      1 calls
       16 ms  C:\code\ccnet-trunk\project\core\core.csproj   1 calls
                 16 ms  Clean                                      1 calls
       16 ms  C:\code\ccnet-trunk\project\Remote\Remote.csproj   1 calls
                 16 ms  Clean                                      1 calls
       31 ms  C:\code\ccnet-trunk\project\Validator\Validator.csproj   1 calls
                 31 ms  Clean                                      1 calls
      297 ms  C:\code\ccnet-trunk\project\ccnet.sln      1 calls
                297 ms  clean                                      1 calls

Target Performance Summary:
        0 ms  CleanReferencedProjects                   10 calls
        0 ms  SplitProjectReferencesByType               8 calls
        0 ms  BeforeClean                               10 calls
        0 ms  ValidateToolsVersions                      1 calls
        0 ms  AfterClean                                10 calls
        0 ms  CleanPublishFolder                        10 calls
       16 ms  _CheckForInvalidConfigurationAndPlatform  10 calls
       16 ms  _SplitProjectReferencesByFileExistence    10 calls
       16 ms  ValidateSolutionConfiguration              1 calls
      141 ms  CoreClean                                 10 calls
      281 ms  Clean                                     11 calls

Task Performance Summary:
        0 ms  FindUnderPath                             20 calls
        0 ms  AssignProjectConfiguration                 8 calls
        0 ms  Message                                   21 calls
        0 ms  MakeDir                                   10 calls
        0 ms  RemoveDuplicates                          10 calls
       16 ms  WriteLinesToFile                          10 calls
       31 ms  ReadLinesFromFile                         10 calls
       78 ms  Delete                                    11 calls
      281 ms  MSBuild                                    4 calls

It’s quite easy to change the verbosity level from NAnt’s MSBuild task:


I was happy to see profiling information because the speed of the build in Visual Studio on our current project is making unit tests painful. Running a single unit test involves waiting for about a minute while the code compiles and ReSharper’s test runner starts up. Then the test runs, generally taking less than a second. The profiling output from MSBuild seems like an ideal way to diagnose the compile speed problem. I played around with different output settings to understand what’s available before tackling the build speed problem. After all, measuring something usually changes it.

One of the first things I noticed was that using the Diagnostic verbosity level very significantly slowed my build down. I decided to quantify that slow down, and check to make sure that the other verbosity levels don’t suffer from a similar problem. Here are the summarized results.

total timestd deviation
verbositycompilecleancompileclean
Diagnostic88.6s19.4s±6.3s±0.6s
Detailed32.1s5.7s±3.8s±0.2s
Normal14.9s1.1s±1.4s±0.03s
Minimal13.5s0.3s±0.8s±0.05s
Quiet14.0s0.3s±1.4s±0.02s

I did 5 builds at each level, and averaged the results. Since I needed to clean anyway between each test, I gathered those stats too. MSBuild provides the information in milliseconds, but I am presenting it in seconds. It seems like Normal is a reasonable setting where the output doesn’t slow the build down significantly. Minimal is slightly faster, and I prefer it anyway because I find the terser output easier to follow.

To gather timings for different verbosities, I didn’t use NAnt, but instead invoked msbuild directly from the command-line. Of the available verbosity levels, only Diagnostic gives the performance summary. Luckily, there is another switch that allows more fine-grained tuning of what appears on the console. Here are a couple of examples, but msbuild /? can give you more information.

C:\code\ccnet-trunk\project>msbuild ccnet.sln /verbosity:Diagnostic

C:\code\ccnet-trunk\project>msbuild ccnet.sln /target:clean /consoleloggerparameters:verbosity=normal;PerformanceSummary

Before jumping to conclusions about MSBuild’s performance, I wanted to check if the slowdown is tied to using Diagnostic level at all, or just using it on the console. After all, the windows command prompt is known to be a bit of a slouch. I tried a build with Diagnostic level logging being sent to a file:

C:\code\ccnet-trunk\project>msbuild ccnet.sln /noconsolelogger /filelogger /fileloggerparameters:verbosity=Diagnostic;PerformanceSummary

With these settings, the build takes only 15.2 seconds, but still generates the full 1.5 megabytes of diagnostic logs. It seems the performance problem really lies with Windows Command Prompt. I want to try to determine if logging suffers the same penalties during a build on a continuous integration server or through Visual Studio. I have not yet discovered how to tweak the verbosity level from Visual Studio. For the CI server, I simply have not yet bothered to do the test. If there is a slowdown during CI, a simple fix may be to log all the output to a file and then include that in the build artifacts.

For now though, I’m planning on tweaking my solution structure as Patrick Smacchia suggests to see if there is a noticeable build speed improvement.

If you follow along, by the end of this blog post you’ll be able to run the hgsubversion tests on your Windows system. Unfortunately, it probably won’t work 100% correctly for you. Like the hgsubversion wiki says, “You should only be using this if you’re ready to hack on it, and go diving into the internals of Mercurial and/or Subversion.”

I really like Mercurial. I think Subversion is starting to get a little creaky. Even worse, for whatever reason access to the CruiseControl.net subversion repository is so slow for me from Australia that most operations I try eventually time out. It’s quite frustrating. Mercurial keeps most of the familiar Subversion operations but adds DVCS goodness like having all history in a local repository. That would nicely solve my speed problems.

I’ve been maintaining a Mercurial repository of cc.net on bitbucket for a few months now. I use the excellent hg subversion extension, installed on my Mac OS X partition. I don’t have an instance of Mercurial on my Windows partition with the hg subversion extension installed. To install on OS X I followed this recipe. I have not found a similarly detailed recipe for Windows. Here’s my attempt at writing such a recipe.

The outline is:

  1. install python 2.6
  2. build and install Mercurial
  3. download subversion binaries
  4. install svn-python bindings
  5. install gnu diffutils
  6. clone hg subversion
  7. configure the win32text extension
  8. install nose
  9. run the tests

I’ll go in to more detail – the above is at least an advanced level exercise. The entire install is a command-line exercise. Because of that, paths are very important. I use a folder c:\code to work with sources. I’ll leave that path in my examples, but remember if you would like to change it to something else that is okay. Do remember to change it everywhere though.

0. Setting up paths

During installation I isolated myself somewhat by using a batch file to reset my path. That gave me more confidence that my existing TortoiseSVN and TortoiseHg installs wouldn’t interfere with the hgsubversion install. Visual Studio installs a Visual Studio 2008 Commmand Prompt shortcut on to the start menu that opens a command window with specific environment variables set. I copied it to create a similar shortcut for my install work. The shortcut uses these settings:

screen-capture.png

Then it’s a matter of editing set_hg_paths.bat to set the correct %PATH% value. It doesn’t matter if %PATH% includes folders that are not yet on disk, so you can set all your paths now and the appropriate pieces will be picked up when they are available. My set_hg_paths.bat file contains:

set PATH=c:\python26\;c:\python26\scripts\;c:\Program Files\svn-win32-1.6.3\bin;C:\Program Files\GnuWin32\bin\;c:\windows\system32;c:\windows;c:\windows\system32\wbem;

1. Install python 2.6

Mercurial is written in python, runs on it, and hg subversion is a collection of python scripts so this is absolutely necessary. I downloaded 2.6.2 from the python home page, and installed it to the default location of c:\python26.

To test this step, open a command prompt using the shortcut from step 0. If you run the commands as shown, you should get the same output:

c:\code>python --version
Python 2.6.2

2. Build and install Mercurial

I have already tried out Mercurial on Windows, using two different pre-packaged Mercurial distributions: one for command-line and one following the TortoiseSCM tradition.

Unfortunately, the pre-built binaries do not seem to be appropriate for extensions. They package the python run-time internally. This is nice on the one hand because people can get Mercurial with a single download. It does make it difficult to experiment however because it is not clear how to add python and hg extensions to the packaged run-time. Maybe if hgsubversion runs well enough on Windows, it will be included in the packages.

To try out hgsubversion, for now, I needed to download the Mercurial source. There are rough instructions for an install from source on the Mercurial wiki. Since I don’t yet have a working hg in my installation environment, I downloaded the 1.3 source archive from the Mercurial site. After downloading I unzipped to c:\code\Mercurial_src. The wiki‘s Standard procedure section describes a two-step build process using build and install targets. I followed those steps.

The build step compiles some C code. The %PATH% variable needs a C compiler for build to work. I have Visual Studio 2008 installed and it comes with a batch file to add the tools to the %PATH%. I added it on to the end of my set_hg_paths.bat. The compiler is only needed for this step, so you may prefer to just execute the batch file once.

set PATH=c:\python26\;c:\python26\scripts\;c:\Program Files\svn-win32-1.6.3\bin;C:\Program Files\GnuWin32\bin\;c:\windows\system32;c:\windows;c:\windows\system32\wbem;

"c:\Program Files\Microsoft Visual Studio 9.0\VC\vcvarsall.bat"

With that set, I opened another command window with the new set_hg_paths.bat and ran the build and install steps. I’ve pasted the beginning and end of the input below. I also saved the full build and install log.

c:\code>set PATH=c:\python26\;c:\python26\scripts\;c:\Program Files\svn-win32-1.6.3\bin;C:\Program Files\GnuWin32\bin\;c
:\windows\system32;c:\windows;c:\windows\system32\wbem;

c:\code>"c:\Program Files\Microsoft Visual Studio 9.0\VC\vcvarsall.bat"
Setting environment for using Microsoft Visual Studio 2008 x86 tools.

c:\code>echo %PATH%
c:\Program Files\Microsoft Visual Studio 9.0\Common7\IDE;c:\Program Files\Microsoft Visual Studio 9.0\VC\BIN;c:\Program
Files\Microsoft Visual Studio 9.0\Common7\Tools;c:\WINDOWS\Microsoft.NET\Framework\v3.5;c:\WINDOWS\Microsoft.NET\Framewo
rk\v2.0.50727;c:\Program Files\Microsoft Visual Studio 9.0\VC\VCPackages;C:\Program Files\\Microsoft SDKs\Windows\v6.0A\
bin;c:\python26\;c:\python26\scripts\;c:\Program Files\svn-win32-1.6.3\bin;C:\Program Files\GnuWin32\bin\;c:\windows\sys
tem32;c:\windows;c:\windows\system32\wbem;

c:\code>cd Mercurial_src

C:\code\Mercurial_src>python setup.py build --force
running build
running build_py
copying mercurial\ancestor.py -> build\lib.win32-2.6\mercurial
.... full log in the attached file ....
copying contrib\win32\hg.bat -> build\scripts-2.6
running build_mo
warning: build_mo: could not find msgfmt executable, no translations will be built

C:\code\Mercurial_src>python setup.py install --force --skip-build
running install
running install_lib
copying build\lib.win32-2.6\hgext\acl.py -> c:\python26\Lib\site-packages\hgext
.... full log in the attached file ....
copying i18n\zh_TW.po -> c:\python26\Lib\site-packages\mercurial\i18n
running install_egg_info
Removing c:\python26\Lib\site-packages\mercurial-1.3-py2.6.egg-info
Writing c:\python26\Lib\site-packages\mercurial-1.3-py2.6.egg-info

C:\code\Mercurial_src>

To test this step, I checked the version of hg that my command-prompt was now picking up. I added a new folder to my %PATH% at this point, although if you followed step 0, you will already have it included.

c:\code>echo %PATH%
c:\python26\;c:\python26\scripts\;

c:\code>hg version
Mercurial Distributed SCM (version 1.3)

Copyright (C) 2005-2009 Matt Mackall  and others
This is free software; see the source for copying conditions. There is NO
warranty; not even for MERCHANTABILITY or FITNESS FOR A PARTICULAR PURPOSE.

3. Download Subversion binaries

As I said before, Mercurial is written in python. To interact with Subversion it makes calls in to Subversion binaries written in C. The easiest, cleanest way to get an up to date version of the Subversion binaries is to download and install a binary distribution of Subversion. This needs to be compatible with the binaries in the next step, so I got both from Subversion’s download page at tigris.org. I downloaded the 1.6.3 binaries compiled against Apache 2.2. After downloading the zip package, I unzipped it to c:\Program Files\svn-win32-1.6.3.

The other binary distributions of Subversion are great, but similarly to Mercurial the basic package is preferred here because it is more compatible with extensions. Slik has a very easy to install, minimal package that is great for clients where command-line or scripting is used. At my current job we use VisualSVN Server as our Subversion repository because it is easy to install and administer on Windows. Unfortunately, I don’t believe they are useful to us for installing hgsubversion.

After adding C:\Program Files\svn-win32-1.6.3\bin to my set_hg_path.bat, I tested this step by opening a new prompt and checking the version of svn that was being picked up:

c:\code>set PATH=c:\python26\;c:\python26\scripts\;c:\Program Files\svn-win32-1.
6.3\bin;

c:\code>svn --version
svn, version 1.6.3 (r38063)
   compiled Jun 22 2009, 09:59:12

Copyright (C) 2000-2009 CollabNet.
Subversion is open source software, see http://subversion.tigris.org/
This product includes software developed by CollabNet (http://www.Collab.Net/).

The following repository access (RA) modules are available:

* ra_neon : Module for accessing a repository via WebDAV protocol using Neon.
  - handles 'http' scheme
  - handles 'https' scheme
* ra_svn : Module for accessing a repository using the svn network protocol.
  - with Cyrus SASL authentication
  - handles 'svn' scheme
* ra_local : Module for accessing a repository on local disk.
  - handles 'file' scheme
* ra_serf : Module for accessing a repository via WebDAV protocol using serf.
  - handles 'http' scheme
  - handles 'https' scheme

4. Install svn-python bindings

This piece is the “glue-code” that allows Mercurial, written in Python, to call the binary Subversion API, written in C. To side-step as many problems as possible these should be from the same compile that created the Subversion binaries. For that reason, I downloaded my bindings from the same page I used above. These are the python 2.6, svn 1.6.3, apache 2.2, win32 bindings packaged as an executable installer.

After downloading, I ran the executable. The setup wizard automatically detected my Python 2.6 installation.
screen-capture-1.png

5. Install gnu diffutils

Mercurial relies on a command-line diff program. diff is ubiquitous on Unix-related systems, but not a common program on Windows. There is a port of the gnu version for windows available as a package called DiffUtils for Windows. I downloaded the Complete package, except sources and ran the wizard to install it.

screen-capture-2.png

To check it, I added C:\Program Files\GnuWin32\bin to my %PATH% and ran diff to make sure it could be found:

c:\code>set PATH=c:\python26\;c:\python26\scripts\;c:\Program Files\svn-win32-1.
6.3\bin;C:\Program Files\GnuWin32\bin\;

c:\code>diff --version
diff (GNU diffutils) 2.8.7
Written by Paul Eggert, Mike Haertel, David Hayes,
Richard Stallman, and Len Tower.

Copyright (C) 2004 Free Software Foundation, Inc.
This is free software; see the source for copying conditions.  There is NO
warranty; not even for MERCHANTABILITY or FITNESS FOR A PARTICULAR PURPOSE.

6. Clone hgsubversion

Having Mercurial working locally at this point, I used it to clone the hgsubversion code from bitbucket. I used the -U option to skip the local working copy checkout, because I want to configure an extension in the repository before getting the local working copy.

c:\code>set PATH=c:\python26\;c:\python26\scripts\;c:\Program Files\svn-win32-1.
6.3\bin;C:\Program Files\GnuWin32\bin\;

C:\code>hg clone -U http://bitbucket.org/durin42/hgsubversion/
destination directory: hgsubversion
requesting all changes
adding changesets
adding manifests
adding file changes
added 475 changesets with 1178 changes to 161 files

7. Configure the win32text extension

Mercurial has a convention of storing line endings for text files as line-feeds only, the Unix convention. The Windows convention is to use both carriage-return and line-feed characters to mark line endings. To work with hgsubversion source on Windows without mixing line endings I configured the win32text extension to handle conversion as files move in and out of the working copy.

To turn it on, I opened up c:\code\hgsubversion\.hg\hgrc and modified the content as follows:

[paths]
default = http://bitbucket.org/durin42/hgsubversion/

[extensions]
hgext.win32text=

[encode]
# Encode files that don't contain NUL characters.
** = cleverencode:

[decode]
# Decode files that don't contain NUL characters.
** = cleverdecode:

[patch]
# Turn on special handling for line-endings at patch-time
eol = crlf

[hooks]
# Reject commits which would introduce windows-style text" files
pretxncommit.crlf = python:hgext.win32text.forbidcrlf

After changing the config, I updated my working copy. Although there is a warning, I’m not sure how to best handle it.

C:\code>cd hgsubversion

C:\code\hgsubversion>hg update
WARNING: tests/test_push_eol.py already has CRLF line endings
and does not need EOL conversion by the win32text plugin.
Before your next commit, please reconsider your encode/decode settings in
Mercurial.ini or C:\code\hgsubversion\.hg\hgrc.
125 files updated, 0 files merged, 0 files removed, 0 files unresolved

Feeling a bit curious I opened up the files in Notepad++, which can show line ending characters. All the files now had CR-LF endings, as expected.

8. Install nose

nose is an alternative Python test runner that hgsubversion uses. There is an explanation in the hgsubversion README file. Since I thought there would probably be test failures, I decided to install nose.

The easiest way to install nose is with a script called easy_install. The Windows Python distribution does not come with the setuptools package that provides easy_install by default, so I installed it first. There is not yet a self-installing package of setuptools for Windows and Python 2.6. This stack overflow question referred me to this script that downloaded and installed setuptools for me. I had to use Save As… in the browser to avoid ending up with html tags and escapes in the script.

c:\code>set PATH=c:\python26\;c:\python26\scripts\;c:\Program Files\svn-win32-1.
6.3\bin;C:\Program Files\GnuWin32\bin\;

c:\code>cd ez_setup

C:\code\ez_setup>python ez_setup.py
Downloading http://pypi.python.org/packages/2.6/s/setuptools/setuptools-0.6c9-py
2.6.egg
Processing setuptools-0.6c9-py2.6.egg
Copying setuptools-0.6c9-py2.6.egg to c:\python26\lib\site-packages
Adding setuptools 0.6c9 to easy-install.pth file
Installing easy_install-script.py script to c:\python26\Scripts
Installing easy_install.exe script to c:\python26\Scripts
Installing easy_install-2.6-script.py script to c:\python26\Scripts
Installing easy_install-2.6.exe script to c:\python26\Scripts

Installed c:\python26\lib\site-packages\setuptools-0.6c9-py2.6.egg
Processing dependencies for setuptools==0.6c9
Finished processing dependencies for setuptools==0.6c9

With easy_install working, it is easy to install nose:

c:\code>set PATH=c:\python26\;c:\python26\scripts\;c:\Program Files\svn-win32-1.
6.3\bin;C:\Program Files\GnuWin32\bin\;

c:\code>easy_install nose
Searching for nose
Reading http://pypi.python.org/simple/nose/
Reading http://somethingaboutorange.com/mrl/projects/nose/
Best match: nose 0.11.1
Downloading http://somethingaboutorange.com/mrl/projects/nose/nose-0.11.1.tar.gz

Processing nose-0.11.1.tar.gz
Running nose-0.11.1\setup.py -q bdist_egg --dist-dir c:\docume~1\admini~1\locals
~1\temp\easy_install-uirbjm\nose-0.11.1\egg-dist-tmp-kslr2c
no previously-included directories found matching 'doc\.build'
Adding nose 0.11.1 to easy-install.pth file
Installing nosetests-2.6-script.py script to c:\python26\Scripts
Installing nosetests-2.6.exe script to c:\python26\Scripts
Installing nosetests-script.py script to c:\python26\Scripts
Installing nosetests.exe script to c:\python26\Scripts

Installed c:\python26\lib\site-packages\nose-0.11.1-py2.6.egg
Processing dependencies for nose
Finished processing dependencies for nose

9. Run the tests

After all that, I ran the tests by executing nosetests in the hgsubversion folder. The results give many failures. I started working to correct them a couple of weeks ago and posted my work to bitbucket. I’ll have to write more about that in a subsequent post. Some of the failures today look new to me.

The start and end of the log follows. Again, I’ve attached the full log.

c:\code>set PATH=c:\python26\;c:\python26\scripts\;c:\Program Files\svn-win32-1.6.3\bin;C:\Program Files\GnuWin32\bin\;c
:\windows\system32;c:\windows;c:\windows\system32\wbem;

c:\code>"c:\Program Files\Microsoft Visual Studio 9.0\VC\vcvarsall.bat"
Setting environment for using Microsoft Visual Studio 2008 x86 tools.

c:\code>echo %PATH%
c:\Program Files\Microsoft Visual Studio 9.0\Common7\IDE;c:\Program Files\Microsoft Visual Studio 9.0\VC\BIN;c:\Program
Files\Microsoft Visual Studio 9.0\Common7\Tools;c:\WINDOWS\Microsoft.NET\Framework\v3.5;c:\WINDOWS\Microsoft.NET\Framewo
rk\v2.0.50727;c:\Program Files\Microsoft Visual Studio 9.0\VC\VCPackages;C:\Program Files\\Microsoft SDKs\Windows\v6.0A\
bin;c:\python26\;c:\python26\scripts\;c:\Program Files\svn-win32-1.6.3\bin;C:\Program Files\GnuWin32\bin\;c:\windows\sys
tem32;c:\windows;c:\windows\system32\wbem;

C:\code>cd hgsubversion

C:\code\hgsubversion>python setup.py build
running build
running build_py
copying hgsubversion\util.py -> build\lib\hgsubversion

C:\code\hgsubversion>nosetests
..FEE..F..FFEEFFEEFFEEEEEEEEFFF..EEFFFFFEEFFFFEF.....FF..FFF.FFFFF..EE..FF.EEEEEEEEEEEEEEEEEEE..EEFF..FFFFFFFFFFFFFFFFFF
FFFF..FFFFFFFFFFFFFFFFFFFFFFFFFFFFFFFFFFFFFFFFFFFFFFFFFFFFFFFFFFFFFFFFEEEEEEFFFFF...EEEEEEFFF......EEEFFEEF
======================================================================
ERROR: test_externals (tests.test_externals.TestFetchExternals)
----------------------------------------------------------------------
Traceback (most recent call last):
  File "C:\code\hgsubversion\tests\test_externals.py", line 60, in test_externals
    self.assertEqual(ref0, repo[0]['.hgsvnexternals'].data())
  File "c:\python26\lib\site-packages\mercurial\context.py", line 84, in __getitem__
    return self.filectx(key)
  File "c:\python26\lib\site-packages\mercurial\context.py", line 159, in filectx
    fileid = self.filenode(path)
  File "c:\python26\lib\site-packages\mercurial\context.py", line 148, in filenode
    return self._fileinfo(path)[0]
  File "c:\python26\lib\site-packages\mercurial\context.py", line 143, in _fileinfo
    _('not found in manifest'))
LookupError: .hgsvnexternals@000000000000: not found in manifest
-------------------- >> begin captured stdout << ---------------------
no changes found

--------------------- >> end captured stdout << ----------------------
.... full text in attached log ....
======================================================================
FAIL: test_rebase (tests.test_utility_commands.UtilityTests)
----------------------------------------------------------------------
Traceback (most recent call last):
  File "C:\code\hgsubversion\tests\test_utility_commands.py", line 176, in test_rebase
    self.assertEqual(self.repo['tip'].parents()[0].parents()[0], self.repo[0])
AssertionError:  != 
-------------------- >> begin captured stdout << ---------------------
no changes found
2 files updated, 0 files merged, 0 files removed, 0 files unresolved
Nothing to rebase!

--------------------- >> end captured stdout << ----------------------

----------------------------------------------------------------------
Ran 225 tests in 161.242s

FAILED (errors=59, failures=132)

That’s it for now. I believe at this point you could install the extension. Things might not work correctly though. I’m going to attempt to get more tests working locally for myself before I try turning it on and cloning anything. Even after that I’ll need to try it with a few different Subversion repositories before using it for code I care about. SCM is too central to my development practices for me to use a shaky system.

When I refactor, I try to get the first piece of the change in with absolute minimal impact on the surrounding code. Once that first bit of the change is in, it often feels like the rest of the code will change itself to adapt. Those changes turn out better than what I could have designed up front. Of course, the code isn’t changing itself – the rest of the team is making the changes. Getting a bit of the change in to the actual system is the clearest way I know of communicating the intention to the rest of the team. Then if my idea makes any sense, the team will get ideas and make changes of their own.

I am taking the same approach with this refactoring. As a first stage, introduce ChangeSet with minimal impact on the rest of the code. Give time for the team to see some of the possibilities. Not removing any existing classes at this point.

What makes this different from refactorings I have done at my day job is the number of people involved. Steve Trefethen reminded me of this on the mailing list today. I had not even considered that someone may have subclassed Modification for their own purposes. But they have. Steve has been on the receiving end of painful breaking changes in the past, so I want to listen carefully to his objections and hopefully minimise his pain. Users sticking with old versions complicates support. And, although Steve is only one user there are probably dozens or hundreds of users experiencing the same issues he is raising.

Now what can be done to avoid breaking other’s code. This whole refactoring centres around one method on the ISourceControl interface:

public interface ISourceControl
{
    Modification[] GetModifications(IIntegrationResult from, IIntegrationResult to);

All the Modification objects in the system are originally returned by a call to this method. The capability to return ChangeSets needs to be introduced at this point. But, changing all the existing implementers of ISourceControl to return ChangeSets at the same time would be too much work. It would also require a lot of users to change their code, because ISourceControl is one of the natural extension points of the system. Fortunately, .net is on my side with this one.

A quick digression to sing the praises of .net. Every single type in .net derives from Object, including all the apparently built-in types like arrays. The compiler does work some magic around descendants of ValueType to pass them on the stack. That way small types like int, bool and float work faster than they would otherwise. You can create your own ValueTypes, passed on the stack, using the struct keyword. All of these still derive from Object.

But getting back to it, every last type is part of the same hierarchy including our Modification[] return type.

screen-capture-1.png

Changing the return type to one of the supertypes of Modification[] would allow us to introduce a new class. Besides changing the method signature, existing code could remain the same and continue to return Modification[].

Using the type closest to the base of the hierarchy provides the most flexibility for implementing another class. I know from previous experimentation that we can use IEnumerable<Modification> for everything except the tests. Linq can cover the test requirements. We have not previously included Linq in the CruiseControl.net codebase and I thought it was because of Mono concerns. I’ve found out today that Linq is included in Mono, so I can use it to update the tests. Time to go make these changes, on a branch.

public interface ISourceControl
{
    IEnumerable GetModifications(IIntegrationResult from, IIntegrationResult to);

I want to make changes to CruiseControl.net’s object model to introduce the concept of Changesets. This is going to be a large change, so I’m expecting I’ll make a few more posts about it. My colleague Mark Needham already posted about a dojo where we did some experimentation around this.

One of the important concepts in CruiseControl.net’s domain is changes to source code. Right now, those changes are modeled with a Modification class:

///
/// Value object representing the data associated with a source control modification.
///
[XmlRoot("modification")]
public class Modification : IComparable
{
    public string Type = "unknown";
    public string FileName;
    public string FolderName;
    public DateTime ModifiedTime;
    public string UserName;
    public string ChangeNumber;
    public string Version = string.Empty;
    public string Comment;
    public string Url;
    public string IssueUrl;
    public string EmailAddress;

Modification was part of the first commit to sourceforge. Even back then, CruiseControl.net supported several source control types: file-based, Perforce, PVCS, StarTeam and Visual Source Safe. A Modification object represents changes to one file. StarTeam, Perforce and PVCS have the concept of atomic changesets, but this is not supported by the model.

Changesets, though, are important. All new SCM systems deal primarily with changesets, rather than single file modifications. This has been the dominant model since at least the year 2000 when Subversion was released. Because they are important, I would like to change ccnet to support them as first-class members of the model. Otherwise, there ends up being code like the following, which is primarily concerned with reconstructing changesets for display purposes:

private string WriteModificationsSummary(IEnumerable modifications)
{
    const string modificationHeaderFormat = "{0}{1}";
    const string issueLinkFormat = "IssueLink{0}";
    StringWriter mods = new StringWriter();

    mods.WriteLine("

#### Modifications in build :
");
    mods.WriteLine("");
    ArrayList alreadyAdded = new ArrayList();
    foreach (Modification modification in modifications)
    {
        string modificationChecksum = modification.UserName + "__CCNET__" + modification.Comment;

        if (!alreadyAdded.Contains(modificationChecksum))
        {
            alreadyAdded.Add(modificationChecksum);

            mods.WriteLine(string.Format(modificationHeaderFormat,
                                         modification.UserName,
                                         modification.Comment));

            if (!string.IsNullOrEmpty(modification.IssueUrl))
            {
                mods.WriteLine(string.Format(issueLinkFormat,
                                             modification.IssueUrl));
            }
        }
    }
    mods.WriteLine("
"); return mods.ToString(); }

I know that I want to introduce a Changeset class. This Changeset will represent the changesets from SCMs that have the concept. For SCMs that don’t it can represent groups of changes with the same comment and committer name, much like in the code above. In the long term, it should replace the Modification class.

At this point in any refactoring, I try to assess how much impact the refactoring will have. The way I go about the refactoring will be different if a lot of files will be touched, compared to one where only a few files will be touched. This is where ReSharper’s Find Usage functionality really shines:

screen-capture.png

859 usages! So this is going to be a big refactoring. Even considering test code separately from application code: 291 in the application code, the remaining 563 in test code. There are 5 unlisted usages. I’m not sure why.

The “shape” of the listing is important as well as the size. The vast majority of the usages are in the Sourcecontrol namespace. I was expecting a lot of changes in the Sourcecontrol area because those classes will be returning a different type of object. That is the point of the refactoring. I was hoping for minimal impact on the rest of the ccnet code where Modification objects are consumed. Even in the long term, we can use an adapter sort of approach to work with Sourcecontrol blocks that can’t be updated to directly produce Changesets. But in the rest of the application, it would be nice to completely remove Modification in a short to medium time frame. Only relatively few places in Publishers, Tasks and Core will need to be changed to accomplish that. So, even though there are many references to the Modification class they are in a good place for this change to work.

The only other thing of note on the listing is that a capitilization difference, “Sourcecontrol” versus “SourceControl”, is causing the test’s namespace to be split. At least that’s a quick fix.

Lately I’ve been learning F#. I have used SML before for little experiments. SML is one of F#’s parents, and a lot of the basic syntax is familiar. The things I’ve been learning and discovering the most about are the large-scale issues. How does C# call F#? F# call C#? Or even, F# call F#? I wasn’t expecting that last one to be a challenge, but it was. Here’s why…

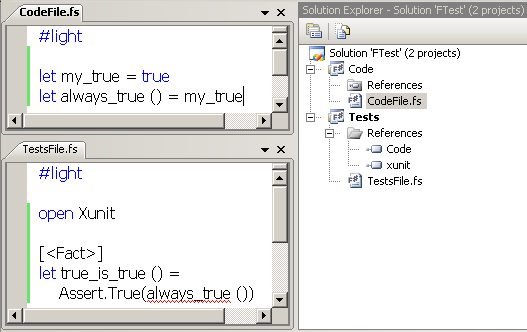
I started in the way I start almost any project: code in one place, tests in another. My first goal is to get the tests calling the code. This means a trivial test like making sure that a function returns true, when it… returns true.

screen-capture-4.png

This is about the simplest F# solution I can picture. I’m already stumbling though, as evidenced by the red squiggly underneath always_true in TestsFile.fs. That squiggle is for a “The value or constructor ‘always_true’ is not defined.” error. But it is defined, over in CodeFile.fs, and I have no idea how to be more specific because all my declarations are top-level. I haven’t had to add any namespace or type names, which is nice. But as a result, I don’t know which namespaces or types these items are part of.

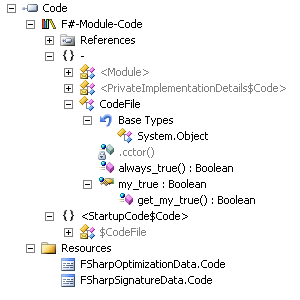
Opening the assemblies in reflector might help:

screen-capture-1.png

There it is! My top-level declarations in CodeFile.fs are part of the CodeFile type in no namespace. always_true is there as a public static method, and my_true is there as a get-only public static property. There are three other internal types in there that have been created by the compiler.

F# will provide this automatic module even if an explicit module is declared in the file. For example, you might think that since always_true and my_true ended up as part of the CodeFile type, that the code in the screenshot above is equivalent to

module CodeFile =
    let my_true = true
    let always_true () = my_true

Just to check, I’ll compile that and open it up in Reflector again.

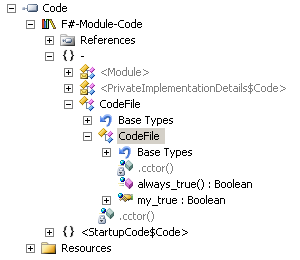
screen-capture-2.png

Instead of overwriting the automatic module, the explicitly declared module is nested inside of the automatic module. The public static type CodeFile, has a nested public static type CodeFile+CodeFile. Not what I was expecting.

The automatic module will continue to be produced unless I add a namespace declaration.

namespace Code

module CodeFile =
    let my_true = true
    let always_true () = my_true

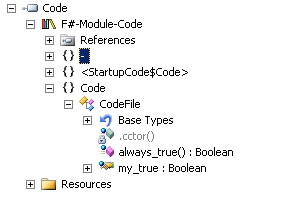
This ends up with a structure more familiar from C# work. CodeFile is a type within the Code namespace.

screen-capture-3.png

I now have a pretty good picture of how the automatic naming works, but there are still scenarios I’d like to try. First, what happens if I declare a namespace but don’t include an explicit module declaration? I have a hunch, but I’ll try it to confirm.

This surprised me! This is a compile-time error. There is no automatic module creation to make this work.

namespace Code

let my_true = true // compile-time error: "Namespaces may not contain values.
                   // Consider using a module to hold your value declarations."

module CodeFile =
    let always_true () = my_true // ok

The second question I had in mind was about mixing a module declaration and top-level declarations in one file. This has been resolved by the previous findings, though. If my file has a namespace declaration, the top-level declarations will be illegal. If it does not have a namespace declaration, then an automatic module with the name of the file will be created.

This is a simpler result than I was expecting, because it means there is only a single rule at play:

  1. If an .fs file does not include a namespace declaration, a module will be created in the top-most namespace to contain the file’s declarations.
    Knowing this, I can return my code under test to how it looked before and get my tests working.

In CodeFile.fs, in the Code project:

#light

let always_true () = true

In TestsFile.fs, in the Tests project:

#light

open Xunit

[] let true_is_true () = Assert.True(CodeFile.always_true ())